Monday, July 30, 2012

My 3 Months Pictures

 I know that I promised 3 month pictures a couple weeks ago, but I am finally getting around to posting them. So here they are! 


After 3 months. 
Then 157 Pounds - Now 138 - Pounds 


This is after one month. This is from month 2 - 3. 
Then 145 Pounds - Now 138 Pounds


And This is my Starting, to finish Pictures. 
3 Months of Progress! 


I still have a ways to go, to get to Bikini Contestant shape. But for 3 months of work, I am happy with it! If I can do anyone can. If this is what I can do in 3 Months what can I do in 8 Months, before spring??? I know I can do it!!! Thanks for reading! 


This weeks Meal Plan

Everyone asks me what I eat. So I have decided that Monday will be my Meal Plan sharing day! I have This chart on my Fridge, in a plastic page protector. I use a dry erase marker. Super easy! Anyway this is my Meal Plan.


L/O = Left Overs
C.S.S = Chicken Salad Sandwich


Sunday, July 29, 2012

Getting Ready for the Week

I have decided that Sunday is going to be my preparation day for the week. I have an afternoon to do whatever I want.

My Sunday Afternoon. It took about 2 1/2 Hours. But, is totally worth it! I got so much done!!!!

Earlier I posted my workout schedule for this week. I know what I am going to do every day for my workouts.

This afternoon, I . . .

Made a Meal Plan for this week. Breakfast, Lunch, Dinner, and Snacks.

Baked Bread. TONS of Bread!

I cut Apples and Celery, put them in a plastic container, and I have snacks all through the week.

Next, I cooked 6 Chicken Breasts. I will shred the chicken and use for snacks, or to add to a salad.

Last, I hard boiled Eggs. Also to use as snacks or to add to my meals.

All of this is make sure that I stay on track with my Clean Eating. All along my family comes first, no matter what. I am going to try anything to make my life easier, to make sure I have time for my family! I think I have figured out how I am going to do it!


My Day of Rest . . . Sort of!

I never workout on Sunday, so this morning instead of working out I am posting here. It seems strange, not to be working out today, I am in such a habit of waking up first thing in the morning and exercising. I guess, thats a good habit to get into.
Even though I don't exercise this morning, I know that my fight with three boys in church is going to be killer! So I post now, while I have the peace and quiet. The calm before the storm :) haha!!!

Yesterday I had a great workout. I worked out with my family, and it was so much fun. I can't wait to do it again. We ran for about 50 minutes. We found a HUGE flight of stairs and ran the stairs 4 times. It was a killer leg/butt workout. I felt the burn!!! After we came home and worked Abs and Arms. Not only was it really fun, but I am sore today. I know I got a good workout.

I am still set on competing in a Bodybuilding, Bikini Competition. Last night I was watching videos on past shows. These women look so amazing and it makes me want to work my hardest, so that I can look like that one day too. It is going to be a lot of work, but I can't wait for the results!

This is my Exercise Plan for this week!

Monday: 10 Minute Bike Ride. 30 Minutes Legs. 20 Minutes Abs. 10 Minute Bike Ride.


Tuesday: 15 Minute Run. 30 Minutes Arms. 20 Minutes Abs. 15 Minutes Pilates.


Wednesday: 20 Minute Bike Ride. 30 Minutes Legs. 15 Minutes Abs. 5 Minute Stretch.


Thursday: 10 Minutes Cardio ( I don't know what yet ) 40 Minutes Arms. 20 Minutes Abs. 10 Minutes Cardio. Stretching.


Friday: Tone and Define Class


Saturday: Run. Abs and Arms. ( As much time as I can get!! )


Sunday: REST

Let the week start!!!!


Friday, July 27, 2012

Healthy Zucchini Bread

I have tons of zucchini from my in laws, we have been making a lot of stir fry. But I wanted something else. I was looking at regular zucchini bread recipes and they are horrible for you! So I found a recipe for clean eating, and I changed it! My boys love it and I will be making more tomorrow!


Clean Eating Zucchini Bread


Ingredients
2 cups whole wheat flour
2 tsp. baking soda
1/4 tsp. nutmeg
2/3 cup honey
1-1 1/2 cups shredded zucchini
2 tbsp. apple sauce
2 tbsp coconut oil
2 whole eggs
1 tbsp. Lemon juice
1/2 cups vanilla oatmeal


Directions


Preheat oven to 350 degrees and oil and flour one large bread pan.


Step 1 – In a mixing bowl, whisk together the flour, baking soda and nutmeg.


Step 2 – In another bowl, Whisk together the honey, zucchini, apple sauce, eggs, coconut oil, lemon juice and yogurt. Mix.


Step 3 – Stir the flour mixture into the wet mixture and blend well.


Step 4 – Pour the batter into the loaf pan and place in the pan in the oven.


Step 5 – Bake for 50-60 minutes or until a tooth pick comes out clean.

Working towards a goal!

Since I posted about wanting to compete, I have been working harder then I ever have! I have been trying so many new exercises that I've found in all my fitness and exercise magazines. I am trying new recipes. I know that I have 8 months, but I'm working towards it now! I want to make sure I'm ready!
Thanks to my sister who told me to try cross training, I've had some amazing workouts! I rode my bike to the gym, I don't know why I never thought of that before! It's only a mile away! Haha!!! Today the gym was closed, what gym closes??? Anyway, I came home and had an awesome workout on my own, that included lunges and squats across my back yard! I don't care if my neighbors think I'm nuts, it was great to exercise outside and my butt still hurts from all those squats!
It's not just exercise anymore, it's fun! And in 8 months I will look amazing! Who knew that exercise and eating healthy can be fun!!!

Wednesday, July 25, 2012

Good morning smoothy!!

You need:
1 cup coconut milk
1 cup frozen strawberries
1/4 cup oatmeal
1/2 cup water

Blend all ingredients and enjoy!

A NEW GOAL!

It's been a couple days since I have updated, it's been a busy weekend! But I'm back and I am ready to start my new goal!!!
Get ready for it ....
I am going to compete in a Bikini Competition!!!!! I'm scared and excited all at the same time!
I have never thought I would even try to do something like this!
The one that I want to do is in March. I have 8 months to prepare for this! I have never felt so motivated. It's a good feeling!
I have lost the weight that I needed to, now I have a new goal! I don't care if I win or even place. The fact that I am doing it, is what's exciting for me! I am happy that the few people that I have told are supportive, most of all my sister. I am on a new journey, that needs a lot of support! So wish me luck!!!

Wednesday, July 18, 2012

Sugaring Hair Removal

I HATE my eyebrows. I was "blessed" with big dark bushy eyebrows. I don't like to wax, I feel like it rips all my hair and my skin off. I don't like to use tweezers because its so time consuming and I have ADD. I found a recipe for sugaring and I thought I would share, because it worked really well. I will be  making this again.

First make sure your hair is long, not to long, but enough for the sugar to grab onto. I tried it on my leg that I shaved 3-4 days ago and it did not pull any hair. But, my eyebrows that are thick, worked like a charm! This really did not hurt, I was surprised, and expecting a lot more pain.

You Need . . . 
1/2 Cup Sugar
1/8 Cup Honey
1/2 TBLS Lemon Juice

To apply. . . 
1 Popsicle stick
2 x 4 inch strips of cotton fabric

Mix everything together and microwave for about 1 - 1 1/2 minutes. Stop and stir every 30 seconds. You want it to boil.

Then let it sit. I had to let it sit about 10 minutes, it is HOT! Stir it every minute or so, don't let it get hard.

When it is still hot, but not dripping off your stick, apply to the hair you want removed with the Popsicle stick. Apply it against the way the hair grows, then quickly add your cotton strip over the top of it. Press hard and rub the fabric, let it sit about 30 seconds. Pull it off against the way the hair grows, and repeat on another section. Don't sugar the same section twice. If there are a couple hairs that did not pull, use tweezers.

This amount is for facial hair, double if you are removing more then facial hair. This will not keep.

And woohoo your done!


Tuesday, July 17, 2012

Hello Tuesday Morning Workout!

Today, I worked Legs and Abs. Again I found these on Pinterest, and they are pretty good workouts! This took me about 45 Minutes to complete! 

I used 8 pound free weights. 


I did different Reps of Arms. 10-20 Sets Each. Totaling 100 times. 


In between each of these sets of 100 I did Arms again, 100 x. 


Monday, July 16, 2012

Jean Skirt


Today, I made another skirt! I LOVE it!!! It turned out so cute, and it only took about 30 minutes to make! I made this skirt our of an old pair of Jeans, that the bottoms are worn and ripped. 

I saw a couple of ideas on pinterest, but the ones that I liked did not have tutorials, so I made up my own and thought I would share! This is how I made my skirt. 

I cut the bottom of the jeans. I measured the skirt from the top of the jeans and cut it at the seem. I made this skirt 22 inches long. You can chose the length of yours. 


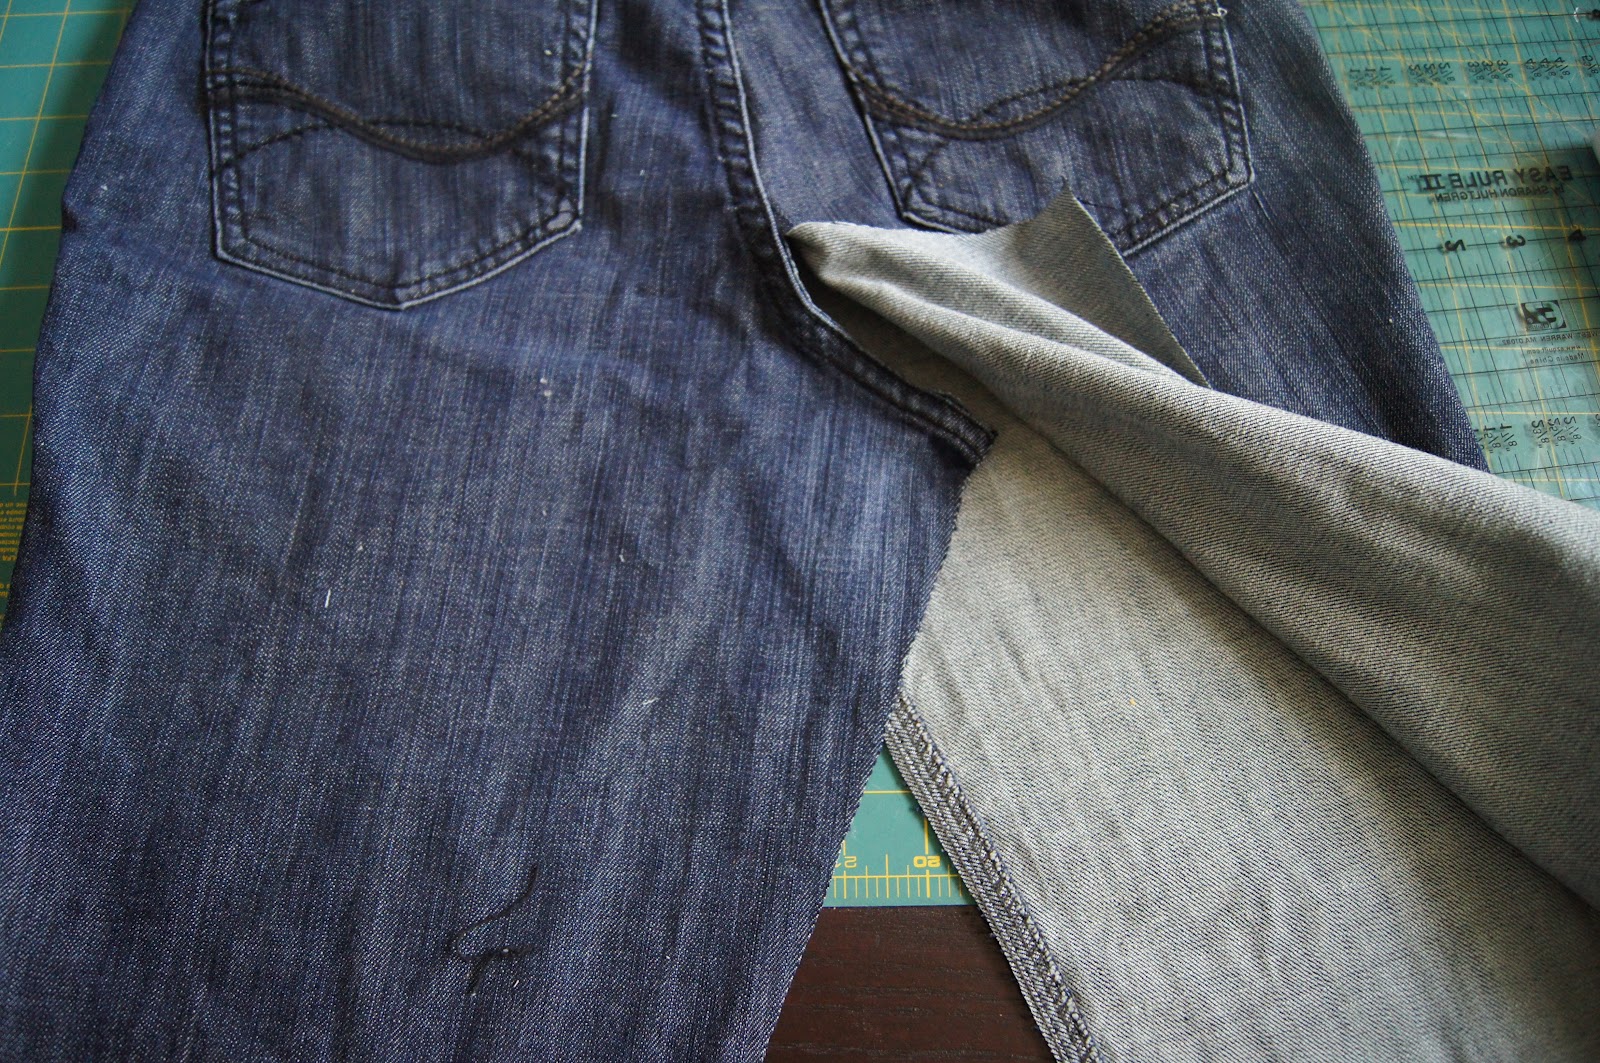
Then I cut up the seems, up the legs, back and front. Get as close to the seem as possible. 


Start with the back. There is extra fabric on the back and I did not want it to have that weird line in the back of my skirt, so I sewed the two sides together, and low as I could down the back of the skirt. 


Fold the extra fabric in, to make a seem line going straight down like this. 


And Pin. 


Sew along pinned line, and back stitch at top and bottom. 


Cut extra fabric out of the inside of skirt. 


For the front, sew down front seem, to make an even opened triangle, below. 


Like this! 


Take extra fabric from the bottom of the jeans you cut, and cut a rectangle, to fit inside the front triangle opening. 


Pin rectangle piece to the inside the the skirt. 


Sew along pinned seems. 


Cut the extra fabric out of the inside of skirt. 


Now for the back! 

Cute fabric, to fit into the open back triangle, like this. 


I added ruffles, to the piece that fits into the back opening. 
Its hard to see, but you get the idea. I wish I would have done the ruffles in a different color, but they turned out cute. 


Pin and Sew Piece into triangle. 


For the bottom, pin a hem of 1/2 inch, all the way around. I added lace to the bottom of mine and it adds so much to it! It makes it so fun. 


And you are DONE!!! Fast huh??? 

Front. 


Back 


And there you have it! Hope you make your own and send me your pictures! I want to see your skirts!!!

BIG Beach Bag

Since we are headed to the beach this Summer, I needed a new beach bag! My other beach bag is a little small. I wanted to make a beach bag that would fit all of our stuff! This bag will fit it all, and its pretty durable. I am happy with how it turned out! Everyone with kids needs a bag this size! I could not find the exact bag I was making so I came up with my own, this is my attempt and showing you how to make your own Big Beach Bag!

To make this bag you need -
Heavy Fabric, I like drapery or upholstery fabric.
Thread

For Bag, Cut Fabric -

1 piece - 10 inches x 57 inches ( Sides and Bottom )
2 Pieces - 18 inches x 21 Inches ( Front and Back )

And for your straps you need 4 pieces - 4 x 57 Inches

Step One 

To Start, Topstitch 1/2 inch on the top your 18 x 21 Inch pieces. I sewed in once, and then sewed another seem next to it to make a little more durable. 

Next sew the ends of your 10 x 57 inch fabric again with 1/2 inch topstitch and sew another seem next to it. 
Put to the side. 


Step Two
The Straps 

Take 2 of the long strap pieces and put them right sides facing, Sew 1/4 inch along each of the sides. 


Turn straps Inside out, and iron flat. 


Step 3 
Attaching the Straps 

Lay your straps onto your 18x21 Piece, 4 inches from each side. Pin straps onto the first piece of 18x21 fabric, then lay it flat and pin other side of straps onto second piece of 18x21 fabric. Make sure straps are not twisted. 


Sew 1/4 inch on each side of each strap starting from the one side of the strap to the other. You still keep sewing the strap until you reach the bottom of the other side. 

It will look like this. 


Step Four 
Attaching the Bottom and sides. 

Next you are going to pin right sides together the long 10x57 piece to the bottom of the 18x21, You will start to pin at the top of the 18x21 Piece. then pin along the side the bottom and up the other side. 
Pin the other 18x21 piece to the 10x57. Starting at the top of the 18x21 pinning along the side, down the bottom, and up the other side. 

Then sew 1/2 Inch along all the pinned edges. 


Turn inside out and this is your bag! 


My Sunday Skirt

I found this site LINK and it had the easiest skirt tutorial. Best of all NO ZIPPER! I love it! This skirt took me about an hour and half to finish, so the next day I made another one! I love how they turned out! The pink one needs some adjusting in the back, but I love how it turned out! I love the lace on the bottom of it,  I will use this pattern again.

Here are my skirts!


The Back